It was spring when we planted and wrote about our first mandala (read the post here). We wrote of our plans to plant 6 mandalas, 2 weeks apart… This didn’t quite happen! Life and building took over and in reality the 6th mandala has yet to be planted. But our huerto has given us a lot of food ever since the beginning of summer and we are growing ever more fond if it!

For me it has been and continues to be quite a learning experience, but the main lesson I have learned is that with a bit of effort and commitment, you can grow your own food with very little knowledge. I remember at first feeling very inexperienced and inadequate, and quite overwhelmed when we came back from the seedling place with what seemed like hundreds of little plants needing planted and nurtured… we had kind of agreed that the huerto would be my thing while Luke got on with the build itself but I didn’t feel at all ready to be left alone with it! Luke gave me a few basic instructions and left me to get on with it – I spent ages wondering whether each plant should be planted deeper into the earth, whether it would be better here or there, whether I had pressed the soil in enough or too much… I laugh now when I look back at my uncertainty as I plant away these days, quickly moving round each bed.
So we made it to 3 summer mandalas, which have kept us well fed on varying amounts of tomatoes, lettuce, peppers, chillis, beetroot, aubergine, onions and leeks at different times throughout.
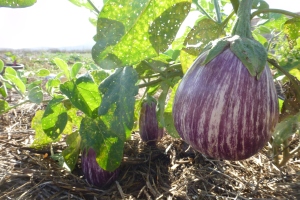
October Aubergines in Mandala 3
We also had other fruit and veg planted outside the mandalas, as they needed more space to grow: melons, pumpkins, cucumber, butternut squash, courgettes, artichokes and okra. We enjoyed a lot of delicious artichokes, simply sliced and then fried in grass-fed butter…

Artichoke feast!

Artichokes fried in grass-fed butter. Mmmmm!
…and this at a time when apparently nobody else’s artichokes were growing! Everyone was so surprised to hear that our plants were bearing fruit out of season – we were none the wiser and have now learned that this plant does not usually require a lot of water and we were watering it along with everything else and they obviously liked it! Let’s see what happens for the rest of the year when the “normal” artichoke season comes round! In the meantime they are providing some beautiful purple flowers that rather remind us of the thistles of Scotland.

Artichoke flowers masquerading as thistles
It does make sense for me to be in charge of the huerto since I am also in charge of putting nutritious food on our table. As many of you know Luke and I are very selective about what we put in our bodies and what better way to control this than to grow our own food. It has been quite a challenge at times but also in a good way, encouraging me to look for recipes to create with the ripening food in our garden. One of my fave discoveries of the year was my tomato soup, invented on a strangely cold and rainy day in August when salad was on the menu but we needed something to warm us up. Luckily I could get my nephew-in-law the superchef Stewie on whats’app to check my progress and ask for tips and I was amazed how well this improvised soup turned out (I was brought up on tinned tomato soup and this is like a natural home made version of the Heinz classic). See the recipe here.

Ca’n Mandala tomato soup
Anyhoo… we planted Mandala 4 in mid July, with our first winter veg and some black cherry tomatoes. We are very much still learning about what to plant when, how long the season lasts for certain veg, when to expect things to be ready… at first I felt a bit stressed by the not knowing, but now I have learnt to relax into the mystery! We are still eating from M4’s cherries and have just eaten our first broccoli, steamed, smothered in grassfed butter and sprinkled with sea salt – Mmmmmmmm!!!! However the cauliflowers and cabbages seem to take a little longer and they will also take a bit more prep I guess… happy to receive any suggestions for recipes for these as I have never cooked a cabbage in my life and feel like I’ve got hundreds on the way!
Before I sign off I must tell you about our latest salad. We have planted some straight beds to make the most of the areas where we had the melons and cucumbers in summer and they are looking just splendid. And since we have been having such amazing weather for October, and having had a bit of a break from salad since a bit of an overdose in summer, we are really enjoying the tender young lettuces along with the black cherry tomatoes, some feta cheese, walnuts and pomegranate seeds, both from our generous neighbour Pepe. We then dress the salad with a spritz of balsamic and a drizzle of our other neighbour Rafa’s olive oil, fruit of the olive grove we can see on the west side of our house.

It is so beautiful to already be feeding ourselves from our land, before we even live here, and to be cultivating relationships with our neighbours, with whom we intend to share and exchange many more things in the future. We really are tasting the life we are creating for ourselves, getting away from the city and the need for public infrastructure, creating our own reality for the life we want to live.


